Deploying
Because this SaaS app is a React/NodeJS/Postgres app built on top of Wasp, Open SaaS can take advantage of Wasp’s easy, one-command deploy or manual deploy to any provider of your choice.
The simplest and quickest option is to take advantage of Wasp’s one-command deploy to Fly.io or Railway.
Or if you prefer to deploy to a different provider, or your frontend and backend separately, you can follow the Deploying Manually section below.
Steps for Deploying
Section titled “Steps for Deploying”These are the steps necessary for you to deploy your app. We recommend you follow these steps in order.
- Get your production API keys and environment variables.
- Set your production environment variables on your deployed apps.
- Add the correct redirect URL’s to your social auth credentials.
- Set your production settings for your payment provider.
- Customize SEO and discoverability (meta tags, JSON-LD,
llms.txt). - Deploy your App through Wasp Deploy commands or manually to any provider.
- (Optional) Deploy your blog.
Each of these steps is covered in more detail below.
Prerequisites
Section titled “Prerequisites”AWS S3 CORS configuration
Section titled “AWS S3 CORS configuration”If you’re storing files in AWS S3, ensure you’ve listed your production domain
in the bucket’s CORS configuration under AllowedOrigins. Check the File
uploading guide for details.
Env Vars
Section titled “Env Vars”Make sure you’ve got all your API keys and environment variables set up before you deploy.
Payment Processor Vars
Section titled “Payment Processor Vars”In the Payments Processor integration guide, you set up your API keys using test keys and test product ids. You’ll need to get the live/production versions of those keys. To get these, repeat the instructions in the Integration Guide without being in test mode. Add the new keys to your deployed environment secrets.
Other Vars
Section titled “Other Vars”Many of your other environment variables will probably be the same as in development, but you should double-check that they are set correctly for production.
Here are a list of all of them (some of which you may not be using, e.g. Analytics, Social Auth) in case you need to check:
General Vars
Section titled “General Vars”-
DATABASE_URL -
JWT_SECRET -
WASP_WEB_CLIENT_URL -
WASP_SERVER_URL
Open AI API Key
Section titled “Open AI API Key”-
OPENAI_API_KEY
Sendgrid API Key
Section titled “Sendgrid API Key”-
SENDGRID_API_KEY
Social Auth Vars
Section titled “Social Auth Vars”-
GOOGLE_CLIENT_ID -
GOOGLE_CLIENT_SECRET -
GITHUB_CLIENT_ID -
GITHUB_CLIENT_SECRET
Analytics Vars
Section titled “Analytics Vars”-
REACT_APP_PLAUSIBLE_ANALYTICS_ID(for client-side) -
PLAUSIBLE_API_KEY -
PLAUSIBLE_SITE_ID -
PLAUSIBLE_BASE_URL -
REACT_APP_GOOGLE_ANALYTICS_ID(for client-side) -
GOOGLE_ANALYTICS_CLIENT_EMAIL -
GOOGLE_ANALYTICS_PROPERTY_ID -
GOOGLE_ANALYTICS_PRIVATE_KEY(Make sure you convert the private key within the JSON file to base64 first withecho -n "PRIVATE_KEY" | base64. See the Analytics docs for more info)
AWS S3 Vars
Section titled “AWS S3 Vars”-
AWS_S3_IAM_ACCESS_KEY -
AWS_S3_IAM_SECRET_KEY -
AWS_S3_FILES_BUCKET -
AWS_S3_REGION
Adding Server Redirect URL’s to Social Auth
Section titled “Adding Server Redirect URL’s to Social Auth”After deploying your server, you need to add the correct redirect URIs to the credential settings. For this, refer to the guides from the Wasp Docs.
Payment Providers Production Settings
Section titled “Payment Providers Production Settings”Stripe
Section titled “Stripe”Now you need to set up your stripe webhook for production use. Below are some important steps and considerations you should take as you prepare to deploy your app to production.
Stripe API Versions
Section titled “Stripe API Versions”When you create your Stripe account, Stripe will automatically assign you to their latest API version at that time. This API version is important because it determines the structure of the responses Stripe sends to your webhook, as well as the structure it expects of the requests you make toward the Stripe API.
Because this template was built with a specific version of the Stripe API in mind, it could be that your Stripe account is set to a different API version.
To make sure your app is consistent with your Stripe account, here are some steps you can follow:
- You can find your
defaultAPI version in the Stripe dashboard under the Developers section. - Check that the API version in your
/src/payment/stripe/stripeClient.tsfile matches the default API version in your dashboard:stripeClient.ts const STRIPE_API_VERSION = "2025-04-30.basil"; // or e.g. 2023-08-16 if using older formatexport const stripeClient = new Stripe(env.STRIPE_API_KEY, {apiVersion: STRIPE_API_VERSION,}); - If they don’t match, you can upgrade/downgrade your Stripe NPM package in
package.jsonto match the API version in your dashboard:
- If your default version on the Stripe dashboard is also the latest version of the API, you can simply upgrade your Stripe NPM package to the latest version.
- If your default version on the Stripe dashboard is not the latest version, and you don’t want to upgrade to the latest version, because e.g. you have other projects that depend on the current version, you can find and install the Stripe NPM package version that matches your default API version by following these steps:
- Find and note the date of your default API version in the developer dashboard.
- Go to the Stripe NPM package page and hover over
Publisheddate column until you find the package release that matches your version. For example, here we find the NPM version13.x.xmatches the API version of2023-08-16.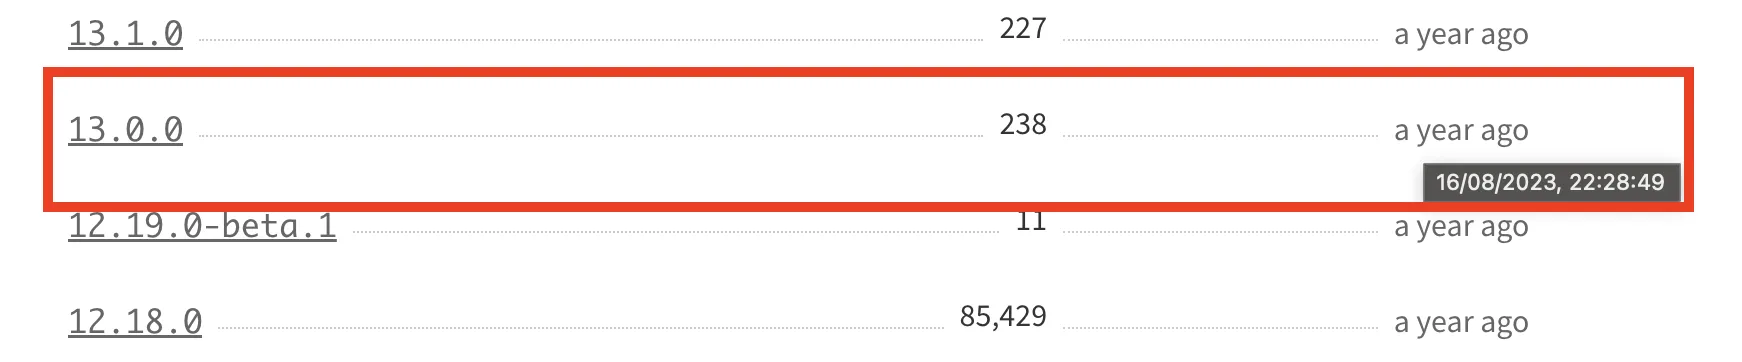
- Install the correct version of the Stripe NPM package by running:
Terminal window npm install stripe@x.x.x # e.g. npm install stripe@13.11.0
- Test your app thoroughly to make sure that the changes you made to your Stripe client are working as expected before deploying to production.
Creating Your Production Webhook
Section titled “Creating Your Production Webhook”- Go to https://dashboard.stripe.com/webhooks
- Click on
+ add endpoint - Enter your endpoint url, which will be the url of your deployed server +
/payments-webhook, e.g.https://open-saas-wasp-sh-server.fly.dev/payments-webhook
- Select the events you want to listen to. These should be the same events you’re consuming in your webhook which are handled in
src/payment/stripe/webhook.ts: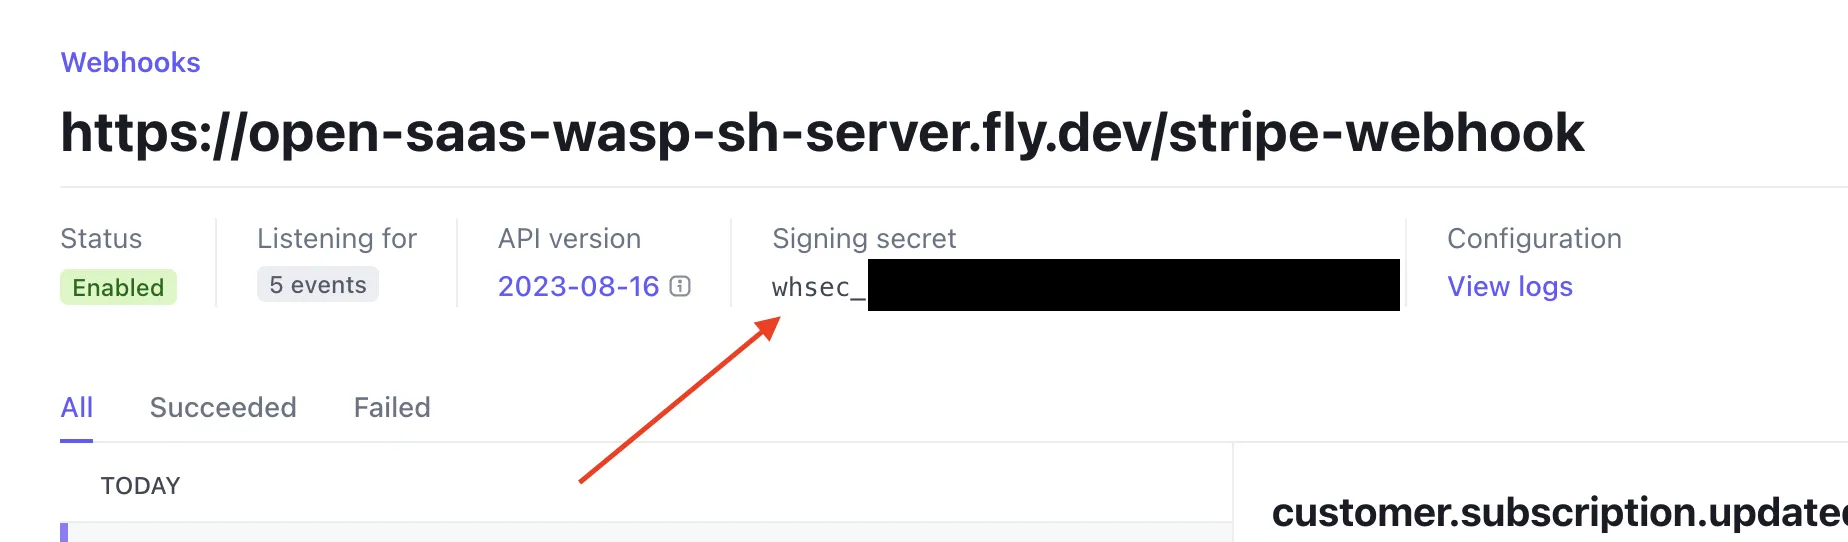
- After that, go to the webhook you just created and
revealthe new signing secret. - Add this secret to your deployed server’s
STRIPE_WEBHOOK_SECRETenvironment variable. If you’ve deployed to Fly.io, you can do that easily with the following command:Terminal window wasp deploy fly cmd --context server secrets set STRIPE_WEBHOOK_SECRET=whsec_...
Lemon Squeezy
Section titled “Lemon Squeezy”Creating Your Production Webhook
Section titled “Creating Your Production Webhook”To set up your Lemon Squeezy webhook, you’ll need the URL of you newly deployed server + /payments-webhook, e.g. https://open-saas-wasp-sh-server.fly.dev/payments-webhook.
With the webhook url ready, go to your Lemon Squeezy Webhooks Dashboard:
- Click the
+button. - Add the webhook forwarding url to the
Callback URLsection. - Give your webhook a signing secret (a long, random string).
- Add this signing secret to your server’s production environment variables under
LEMONSQUEEZY_WEBHOOK_SECRET. - Make sure to select at least the following updates to be sent:
order_createdsubscription_createdsubscription_updatedsubscription_cancelled
- Click
save.
Turning off the Sandbox mode
Section titled “Turning off the Sandbox mode”Make sure to turn off the sandbox mode in your server’s production environemnt:
POLAR_SANDBOX_MODE=falseCreating Your Production Webhook
Section titled “Creating Your Production Webhook”To set up your Polar webhook, you’ll need the URL of your newly deployed server + /payments-webhook, e.g. https://open-saas-wasp-sh-server.fly.dev/payments-webhook.
With the webhook URL ready, in your Polar Dashboard:
- Navigate to
Settings > Webhooks. - Click the
Add Endpointbutton. - In the URL field, paste your production forwarding address.
- Set the
Formatto"Raw". - Select the following events to listen for:
order.paidsubscription.updated
- Click
Save. - Copy the generated webhook secret and set it as the
POLAR_WEBHOOK_SECRETenvironment variable in production.
Customizing SEO and Discoverability
Section titled “Customizing SEO and Discoverability”Before deploying, make sure your app’s meta tags, JSON-LD schema, and llms.txt reflect your production URL and content so search engines and AI/LLM tools can index and recommend your app correctly. See the SEO guide for details.
Deploying your App
Section titled “Deploying your App”Deploying to Fly.io
Section titled “Deploying to Fly.io”Fly.io is a platform for running your apps globally. It’s a great choice for deploying your SaaS app because it’s free to get started, can host your entire full-stack app in one place, scales well, and has one-command deploy integration with Wasp.
Wasp provides the handy wasp deploy command to deploy your entire full-stack app (DB, server, and client) in one command.
To learn how, please follow the detailed guide for deploying to Fly via the Wasp CLI from the Wasp documentation. We suggest you follow this guide carefully to get your app deployed.
Deploying Manually
Section titled “Deploying Manually”If you prefer to deploy manually, your frontend and backend separately, or just prefer using your favorite provider you can follow Wasp’s Manual Deployment Guide.
Deploying your Blog
Section titled “Deploying your Blog”Deploying your Astro Starlight blog is a bit different than deploying your SaaS app. As an example, we will show you how to deploy your blog for free to Netlify. You will need a Netlify account and Netlify CLI installed to follow these instructions.
Make sure you are logged in with Netlify CLI:
- You can check if you are logged in with
netlify status. - You can log in with
netlify login.
Position yourself in the blog directory and run the following command:
npm run buildThis will build your blog into the blog/dist directory. Now you can deploy your blog to Netlify with the following command:
netlify deploySelect the dist directory as the deploy path.
Finally, if the deployment looks good, you can deploy your blog to production with the following command:
netlify deploy --prod