Paddle
First, make sure you’ve defined your payment processor in src/payment/paymentProcessor.ts and src/payment/paymentProcessorClient.ts, as described in the important first steps.
Next, you’ll need to create a Paddle account in the sandbox mode. You can do that here.
Sandbox and Production Mode
Section titled “Sandbox and Production Mode”Paddle features two separate environments:
They are fully isolated from each other, which means that you need to create separate accounts for each of them. They also feature independent products, prices, API keys, etc.
For local development and testing, you’ll want to use Paddle’s sandbox mode.
To enable sandbox mode, make sure that PADDLE_SANDBOX_MODE is set to true in your .env.server file, and REACT_APP_PADDLE_SANDBOX_MODE is set to true in your .env.client file:
PADDLE_SANDBOX_MODE=trueREACT_APP_PADDLE_SANDBOX_MODE=trueWhen you’re ready to deploy your app, we’ll remind you to set these to false.
Paddle API Key
Section titled “Paddle API Key”Once you’ve created your account, you’ll need to get your API key. You can do that by:
- Navigating to
My Account > Settings. - Opening the
Developer Tools > Authenticationpage. - Click on the
New API keybutton to create a new key. - Give your key a name (e.g., “Open SaaS Development”).
- Select the following permissions:
Customer portal sessions: writeCustomers: read and writeMetrics: readReports: readTransactions: read and write
- Copy the generated key and add it to your
.env.serverfile:.env.server PADDLE_API_KEY=pdl_sdbx_apikey_...
Paddle Client-side Token
Section titled “Paddle Client-side Token”Paddle’s checkout runs in the browser with Paddle.js, which needs a client-side token. You can get one by:
- Navigating to
My Account > Settings. - Opening the
Developer Tools > Authenticationpage. - Selecting the
Client-side tokenstab. - Click on the
New client-side tokenbutton to create a new token. - Give your token a name (e.g., “Open SaaS Development Client”).
- Copy the generated token and add it to your
.env.clientfile:.env.client REACT_APP_PADDLE_CLIENT_TOKEN=test_...
Default Payment Link
Section titled “Default Payment Link”Paddle requires a default payment link before it can open a checkout. Paddle doesn’t accept localhost URLs, but in sandbox mode the link isn’t actually visited, so you can use https://example.com.
To set it:
- Navigate to
Checkout > Checkout configuration. - Set the
Default payment linktohttps://example.com. - Click
Save.
In production, you’ll need to set it to your deployed app’s URL. We’ll remind you to do that when you deploy your app.
Creating Products
Section titled “Creating Products”To create Paddle products, in your Paddle dashboard:
- Navigate to the
Catalog > Productspage. - Click on the
+ New productbutton to create a new product. - Fill in the product details and click
Save. - Click on your newly created product in the
Catalog > Productslist to open its product page. - On the product page, click on the
New Price +button.- Fill in the
Internal description(e.g. “Monthly”). It’s required, but isn’t shown to your customers. - Set the
Base price(e.g.9.99). - For subscription products, select a
Recurringbilling period (e.g. monthly). - For one-time payment products, select
One-time. - Set the quantity to a minimum of
1and a maximum of1. Open SaaS grants one plan (or one pack of credits) per purchase, so customers shouldn’t be able to buy more than one at a time.
- Fill in the
- Click
Save. - Copy the
Price ID(it starts withpri_). Note that Open SaaS uses the price ID, not the product ID. - Add the
Price IDto your.env.serverfile. Open SaaS by default expects three products, two subscriptions and one one-time purchase plan:.env.server PAYMENTS_HOBBY_SUBSCRIPTION_PLAN_ID=<your-hobby-price-id>PAYMENTS_PRO_SUBSCRIPTION_PLAN_ID=<your-pro-price-id>PAYMENTS_CREDITS_10_PLAN_ID=<your-credits-price-id>
Using Paddle Webhook in Local Development
Section titled “Using Paddle Webhook in Local Development”Exposing your Webhook Endpoint to the Internet
Section titled “Exposing your Webhook Endpoint to the Internet”Paddle notifies your Wasp app about customer and payment events through a webhook. However, to make it available to Paddle during development, you need to expose your locally running Wasp server (started with wasp start) to the internet.
You can do that by running ngrok on port 3001 (Wasp server runs on port 3001 by default). ngrok will then generate a public URL that we can provide to Paddle:
- First, make sure you have installed
ngrok. - Once
ngrokis installed and your Wasp app is running, run:Terminal window ngrok http 3001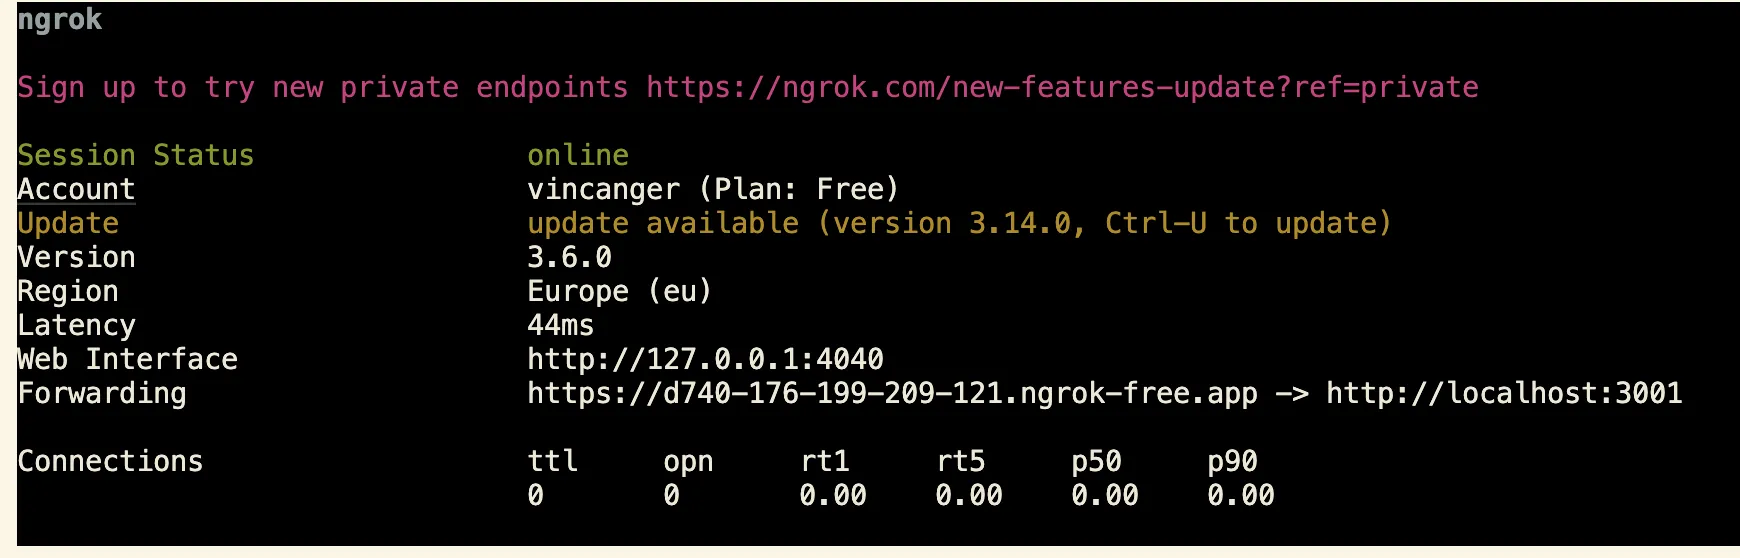
ngrokwill display a forwarding address. Copy this address and append/payments-webhookto it. It should look something like this:Callback URL https://89e5-2003-c7-153c-72a5-f837.ngrok-free.app/payments-webhook
Creating your Paddle Webhook
Section titled “Creating your Paddle Webhook”Next, configure the webhook in your Paddle dashboard:
- Navigate to the
Events > Notificationspage. - Click the
+ New destinationbutton. - Fill in the
Description(e.g. “Open SaaS Development”). - Set the
Notification TypetoWebhook. - In the URL field, paste your
ngrokforwarding address with/payments-webhookappended (for example:https://abc123.ngrok-free.app/payments-webhook). - Set the
Usage typetoBoth. - Select the following events to listen for:
transaction.completedsubscription.updatedsubscription.canceled
- Click
Save. - Click on your newly created destination in the
Events > Notificationslist to open it. - Click copy on the
Secret keyand add it to your.env.serverfile:.env.server PADDLE_WEBHOOK_SECRET=pdl_ntfset_...
Testing Payments in Local Development
Section titled “Testing Payments in Local Development”Before testing payments, make sure that you created and set all the required env variables in .env.server (PADDLE_API_KEY, <NAME>_PLAN_ID and PADDLE_WEBHOOK_SECRET) and .env.client (REACT_APP_PADDLE_CLIENT_TOKEN), that you set a default payment link, and that your ngrok tunnel is running.
You can then test the payment flow:
- Click a
Buybutton for any product on the homepage. - Paddle’s checkout should open as an overlay on the page.
- Fill in the checkout form with test payment information.
- Complete the payment.
- You should be redirected to the checkout success page.
To verify everything executed correctly you can:
- Check Paddle webhook event logs:
- Navigate to the
Events > Notificationspage. - Open your previously created destination.
- Confirm all of the events have been delivered successfully.
- Navigate to the
- Inspect your database’s
Usertable:- Run Wasp DB studio:
Terminal window wasp db studio - Navigate to
localhost:5555and check theUsertable. - Confirm the
subscriptionStatusisactivefor the user who made the purchase.
- Run Wasp DB studio: